Preikestolen (Pulpit Rock)
How would you rate Preikestolen (Pulpit Rock)?
Tap a star to share your experience and help other hikers.
Preikestolen (Pulpit Rock): A Short, Steep Lysefjord Hike
HikeList Score
Preikestolen (Pulpit Rock) scored 81/100 on HikeList's trail-quality metrics.
See score breakdownHide breakdown
- Ideal length 55
- Balanced challenge 100
- Scenery & wildness 78
- Varied terrain 100
- Accommodation 84
- Food & support 68
- Path quality 98
- Season flexibility 89
Computed from length, challenge, scenery & wildness, terrain variety, accommodation, food & support, path quality and season flexibility.
Preikestolen, or Pulpit Rock, is an 8 km out-and-back day hike in the Ryfylke region of Rogaland, south-west Norway. The route climbs from Preikestolen Fjellstue near Jørpeland to a flat granite cliff standing 604 m above the Lysefjord. Allow about 4 hours return. It is moderate: short, well-used and upgraded, but steep and rocky in places, with uneven boulders, wet boardwalk sections and an unfenced cliff edge at the plateau.
Route Overview
The hike starts and ends at Preikestolen Fjellstue, the mountain lodge and Basecamp near Jørpeland, roughly 10 minutes’ drive from the village. From the lodge, the path climbs through forest, crosses boggy ground on timber boardwalks and Sherpa-built stone steps, then passes Tjødnane/Tjessvatnet before continuing over boulder fields and open rock. Intermittent views over the Lysefjord build towards the final steep rocky section onto the Preikestolen plateau. It is an out-and-back route, so you return the same way. There is a parking fee at the trailhead, and a seasonal shuttle bus runs from Stavanger and Jørpeland. For tougher Norwegian mountain days, compare Besseggen Ridge, Gaustatoppen Summit Trail or the longer Hardangervidda Traverse.
Geology and Trail History
Preikestolen is a granite cliff shaped by glacial and frost action during the last Ice Age, when angular blocks were broken away to leave the flat rock shelf. The site was promoted for tourism from around 1900 by the local tourist association. The modern route was heavily upgraded between 2013 and 2016 with Sherpa stonework and boardwalks, with further work from 2019. Around 300,000 people visited in 2024.
Notable highlights
- Preikestolen plateau (about 25 x 25 m): The destination is a flat granite shelf standing 604 m above the Lysefjord. The edge is unfenced, so stay well back in wind, rain or crowds.
- Lysefjord views: The fjord stretches some 42 km inland between steep rock walls. Views open up during the climb and are widest from the plateau.
- Sherpa stone steps and boardwalks: Nepalese Sherpa craftsmen built much of the stone staircase on the steepest sections. Timber boardwalks protect the boggy ground and make wet sections more manageable.
- Tjødnane/Tjessvatnet mountain lake: This small tarn lies partway along the route and makes a natural pause before the upper rocky section.
- Glacial boulders and bare rock: Ice-smoothed slabs and large erratic boulders on the upper trail show the landscape’s glacial origins.
- Seven sisters folklore: Local legend says the plateau will crash into the fjord on the day seven sisters marry seven brothers from the area.
Challenges to expect
Expect a short but physical hike: steep stone steps, uneven boulders, open rock and wet boardwalks. The path can be slippery after rain, and the route undulates over several ridges, so cumulative ascent is around 500 m even though the headline gain is about 350 m. The plateau is unfenced with a sheer drop. From November to April, snow and ice mean winter equipment and ideally a guide.
HikeList Score
Preikestolen (Pulpit Rock) scored 81/100 on HikeList's trail-quality metrics.
See score breakdownHide breakdown
- Ideal length 55
- Balanced challenge 100
- Scenery & wildness 78
- Varied terrain 100
- Accommodation 84
- Food & support 68
- Path quality 98
- Season flexibility 89
Computed from length, challenge, scenery & wildness, terrain variety, accommodation, food & support, path quality and season flexibility.
 Norway
Show more data Show less
- Mountainous
- Forest
- Marsh
- Open Rock
- Dirt
- Rocky
- Stone Steps
- Timber Boardwalks
- Huts
- Hotels
- Campsites
- Wild Camping Spots
- Family Friendly
- Pet Friendly
- Restrooms
- Campsites
Download Our Full Guide to Preikestolen (Pulpit Rock) FREE!
Get our comprehensive guide to this hike for free. Save it for later reading or print out at home.

Photos from hikers
Taken on the trail by people who've reviewed Preikestolen (Pulpit Rock).
Preikestolen (Pulpit Rock): The Complete Guide
Preikestolen (Pulpit Rock) is Norway’s classic short mountain hike: a steep, rough out-and-back from Preikestolen Fjellstue / Basecamp to a flat granite platform high above the Lysefjord. It suits reasonably fit first-timers, families with older children and experienced walkers who want a compact but memorable fjord walk.
The route is only about 8 km return, but it feels more serious than the distance suggests. The path climbs through pine forest and heath, crosses boggy ground on timber boardwalks, then tackles Sherpa-built stone steps, boulders and open granite slabs.
The reward is the Preikestolen plateau itself, a roughly 25 × 25 m rock shelf standing 604 m above the fjord. There is no fence at the edge, so the final viewpoint demands calm judgement, especially in wind, rain or crowds.
This is not a technical climb, but it is a proper mountain walk. Expect around 500 m of cumulative ascent, slippery rock after rain, uneven footing and a descent that can be slow when the trail is busy.
This guide covers the stages, days, accommodation, food, transport, terrain and common mistakes for planning the Preikestolen hike properly.
Stage-by-Stage Guide
Stage 1: Preikestolen Fjellstue / Basecamp car park to Urskaret / Urskarhøe
The walk starts beside Preikestolen Fjellstue / Preikestolen Basecamp and the main car park, at roughly 270–290 m above sea level. This is the only fully serviced point on the route, with the lodge, café, parking and onward road access all concentrated at the trailhead.
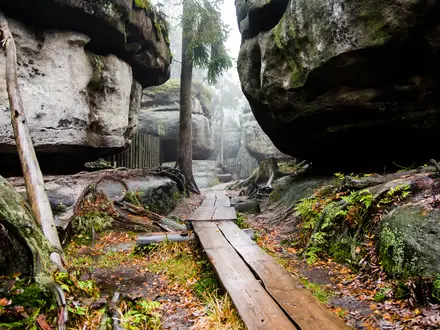
The first 1.5 km is a steep warm-up rather than an easy approach. The marked path climbs through pine forest and heath on rough mountain ground, using Sherpa-built stone steps on the steeper sections and timber boardwalks where the ground becomes boggy.
Underfoot, expect uneven stone, boulders, wet patches and sections of planking. The boardwalks make the marshy ground straightforward in normal conditions, but rock and timber can both be slippery after rain or in cold weather.
Urskaret / Urskarhøe, around 418 m, marks the end of the first main climb and gives a useful point to judge pace. If this opening section feels hard, allow more time for the upper trail rather than pushing on too quickly.
There is no food or reliable drinking-water service once away from the lodge and car park. Carry all food, water and weather layers from the start, even though the route is short.
Accommodation is at or near the trailhead rather than on the trail: Preikestolen Fjellstue / Basecamp has rooms, cabins, camping and a café, while Jørpeland and Stavanger provide wider lodging options. There are no overnight huts on this route.
Public transport and road access are also focused on the trailhead. Seasonal shuttle buses run from Stavanger city centre and from Jørpeland to the Preikestolen car park, and drivers reach it via Ryfast / Ryfylketunnelen, Solbakk and Jørpeland. Current shuttle times, parking fees and any trailhead restrictions should be checked before travelling.
Navigation is straightforward in clear conditions: follow the red-painted DNT T markers, wooden signposts and cairns. Do not treat the broad, engineered path as a reason to ignore the weather; mist, rain and early darkness can still make the route feel much more serious.
Stage 2: Urskaret / Urskarhøe to Neverdalsskaret saddle
From Urskaret / Urskarhøe the route continues for about 1.2 km towards Neverdalsskaret, a higher saddle at around 532 m. This middle section is more open and rockier, with the first broader views beginning to appear as the trail leaves the lower forested ground behind.
The path crosses scree, bouldery ground and further constructed stonework. This is one of the sections where the Sherpa-built staircases are most noticeable, helping the route climb efficiently through terrain that would otherwise be slow and eroded.
The walking remains moderate rather than technical, but the effort is real. The trail rises in steps rather than in one smooth climb, so short flatter stretches can be followed by another steep pull.
Neverdalsskaret is a useful psychological landmark because much of the main height gain has been done, though the route still undulates before the plateau. Views towards the Lysefjord begin to open from this part of the walk, especially in clear weather.
There are still no food, café or accommodation facilities at the saddle. Natural water and tarns in the mountains should not be relied on as a planned drinking supply; bring enough from the trailhead.
There is no intermediate road access here. Anyone turning back does so by retracing the marked route to Preikestolen Basecamp and the car park.
Keep following the red T waymarks and cairns across the rougher ground. In poor visibility, avoid wandering onto unmarked rock simply because it looks direct; the official path is designed to keep walkers on the most sustainable and manageable line.
Stage 3: Neverdalsskaret to Tjødnane lakes
The section from Neverdalsskaret to Tjødnane is short, about 0.6 km, but it should not be rushed. The terrain remains uneven and mountain-like, with open granite, boulders and wet ground bridged in places by timber boardwalks.
Tjødnane is a cluster of small mountain lakes roughly 1 km before Preikestolen. It is one of the best natural rest points on the walk, particularly before the final approach to the cliff.
There is a small emergency shelter near Tjødnane, but it is not accommodation and should not be planned as an overnight stop. This is a day hike, and the practical overnight options remain the trailhead lodge, Jørpeland or Stavanger.
The lakes are also a known summer pause point, and some walkers use them for a cold swim in warm conditions. That should be treated as optional and weather-dependent, not as part of the walking plan; cooling down too much before the final section can be unhelpful in wind or cloud.
There is no food service at Tjødnane and no road access. Carry out all litter and continue to manage water, snacks and warm layers with the return walk in mind, not just the outward leg.
Navigation remains by red T marks, cairns and the worn mountain path. The open slabs can make the route feel less enclosed than the lower forest, so take extra care in mist or heavy rain.
Stage 4: Tjødnane lakes to Preikestolen plateau, then return to the car park
The final outward section is about 0.7 km from Tjødnane to Preikestolen. It crosses more open, ice-smoothed granite and bouldery ground before reaching the famous flat rock shelf above the Lysefjord.
Preikestolen itself is a roughly 25 × 25 m granite plateau standing 604 m directly above Lysefjorden. The view is the main reward of the route, with the fjord and surrounding rock walls opening suddenly and dramatically from the edge.
The key safety point is that the plateau edge is unfenced. Stay well back in wind, rain, poor visibility or crowds, and give other walkers space rather than queuing or jostling near the drop.
A large fissure cuts the rock shelf, linked with local folklore about the cliff eventually falling into the fjord. Treat it as part of the exposed rock landscape, not as a place for careless posing or jumping.
There is no café, shelter or formal facility on the plateau. Eat and drink only what has been carried in, and remember that the descent still takes around 1.5–2 hours for many walkers.
The return is by exactly the same route via Tjødnane, Neverdalsskaret and Urskaret / Urskarhøe to Preikestolen Fjellstue / Basecamp. Descending the stone staircases, slabs and boulders can be harder on knees and more slippery than the climb, especially after rain.
Allow enough daylight for the full out-and-back. In the normal spring-to-autumn walking season the route is a moderate mountain day; outside that period, ice, snow and short daylight make it a winter undertaking requiring suitable equipment and, ideally, a guide.
Back at the car park, the lodge and café are the first services reached. Shuttle-bus users should plan the descent around the last departure rather than assuming frequent late transport; timetables and operating seasons should be checked before travelling.
Recommended Itinerary
Preikestolen is a one-day out-and-back hike, so the sensible itinerary is not a multi-day schedule but a single walking day broken into practical route sections. Most walkers should plan on about 4 hours of walking time, plus stops at Tjødnane and on the plateau.
Standard itinerary
| Day | From | To | Approx. distance | Why this stage makes sense | Services/accommodation notes |
|---|---|---|---|---|---|
| 1 | Preikestolen Fjellstue / Preikestolen Basecamp car park | Urskaret / Urskarhøe | About 1.5 km | This first section gains height quickly through forest and onto boardwalks, giving a clear early test of pace and footwear. Take it steadily rather than starting too fast on the stone steps. | Trailhead services are at Preikestolen Fjellstue / Basecamp, with lodging, cabins, camping and a café. There are no overnight huts on the route. |
| 1 | Urskaret / Urskarhøe | Neverdalsskaret | About 1.2 km | The route becomes rougher and more open, with scree, stone-built steps and the first bigger Lysefjord views. This is a good point to reassess weather, visibility and how confident everyone feels on wet rock. | No services on this section. Carry all food, water and spare layers from the trailhead. |
| 1 | Neverdalsskaret | Tjødnane lakes | About 0.6 km | This shorter section leads to the small mountain lakes about 1 km before the plateau. It is the natural rest stop before the final approach, especially on busy days when the plateau itself may be crowded. | Tjødnane has a small emergency shelter nearby, but it is not accommodation. Do not plan to overnight on the trail. |
| 1 | Tjødnane lakes | Preikestolen plateau, then return the same way to the car park | About 0.7 km out to the plateau; about 8 km return in total | The final approach crosses open rock to the unfenced granite shelf above Lysefjorden. Allow unhurried time here, but stay well back from the edge, especially in wind, rain or crowds, then return by the same marked path. | Overnight before or after the hike at Preikestolen Basecamp, in Jørpeland, or in Stavanger. If relying on shuttle buses, check current timetables before committing to a late return. |
Slower variant
A slower plan suits families with older children, first-time hikers, photographers and anyone who wants a longer break at Tjødnane or on the plateau. Use the same route, but allow a generous half day rather than treating the hike as a quick four-hour outing.
Staying at Preikestolen Basecamp the night before makes this easier, as it removes the need to coordinate an early transfer from Stavanger. Jørpeland is also a practical base, while Stavanger works well if using a car through Ryfast / Ryfylketunnelen or a seasonal shuttle.
Faster variant
Fit, sure-footed walkers can complete the out-and-back more quickly, but the route is still rough mountain terrain rather than a smooth viewpoint path. The descent over wet slabs, boulders and stone steps is where rushing most often becomes a problem.
A faster schedule is most sensible in stable weather, with proper footwear and an early start to avoid the heaviest crowds. Even then, the plateau edge remains unfenced and should be treated with the same caution regardless of pace.
Planning the Route
Preikestolen is a one-day there-and-back hike, not a route that needs staging. Most walkers should plan it as a half-day walk with enough spare time for transport, weather delays, rests on the climb and time on the plateau.
Although the walking time is commonly around 4 hours return, it is better planned as an unhurried mountain outing rather than a quick viewpoint dash. The path is short, but the steep stone staircases, wet boardwalks, rough boulders and open granite slabs slow the pace, especially in rain or when the trail is busy.
How to break up the walk
There are no overnight trail stages and no huts to book on the route. The natural breaks are terrain sections, which help with pacing rather than accommodation planning.
| Section | Planning notes |
|---|---|
| Preikestolen Fjellstue / Basecamp to Urskaret / Urskarhøe | The first meaningful climb starts soon after the car park, with forest, stone steps and boardwalks. Settle into a steady pace here rather than pushing hard early. |
| Urskaret / Urskarhøe to Neverdalsskaret | Rougher ground and more open terrain begin to appear, with the first wider views. This is a good point to reassess weather and footing before continuing higher. |
| Neverdalsskaret to Tjødnane | A shorter section to the small mountain lakes, about 1 km before the plateau. Tjødnane is a natural rest stop, with an emergency shelter nearby, but it is not overnight accommodation. |
| Tjødnane to Preikestolen plateau | The final approach is rockier and more exposed. Allow extra time here in crowds, wind, rain or poor visibility, then return by exactly the same route. |
Where to stay before the hike
Accommodation choice mainly affects how early and easily the day can start. Preikestolen Fjellstue / Preikestolen Basecamp is at the trailhead and is the simplest option for an early start, with rooms, cabins, camping and a café.
Jørpeland is the nearest village base, while Stavanger has the widest choice of hotels, hostels and apartments and is about 40 minutes away by road. If staying in Stavanger or Jørpeland without a car, the walking plan needs to be built around the seasonal shuttle-bus timetable.
Transport planning
By car, the route to the trailhead from Stavanger uses the Ryfast subsea tunnel, Ryfylketunnelen, to Solbakk, then continues via Jørpeland to the Preikestolen car park. The old Stavanger–Tau car ferry is no longer the standard access route since the tunnel opened.
Seasonal shuttle buses run from Stavanger city centre and from Jørpeland to the trailhead, with operators such as Pulpit Rock Tours, Go Fjords and Boreal/Kolumbus. Timetables, operating dates and return times should be checked before travelling, especially outside the main summer period.
Parking at the trailhead is paid, with recent charges around NOK 250–275 per car. Current parking fees should be checked before travelling.
A Lysefjord sightseeing cruise from Stavanger’s Strandkaien is a separate way to see Preikestolen from below, and is often combined with the hike as part of a longer day. Treat this as an add-on to the walking plan, not as an alternative route off the plateau.
Shortening, extending and section hiking
Preikestolen is easy to shorten in only one practical sense: turn around and retrace the same path. There are no intermediate villages, road exits or hut stops on the trail.
Section hiking is not really relevant because the full route is only a day walk. The waypoints are useful for pacing and decision-making, but they do not create separate walkable stages with transport links.
Extending the day is usually done by spending more time at Tjødnane or on the plateau, or by pairing the hike with time in Jørpeland, Stavanger or a Lysefjord cruise. Any extra walking beyond the marked Preikestolen route should be planned separately rather than assumed from the main trail.
What matters most when planning
Weather and season matter more than mileage. The usual unguided hiking season is roughly May to October; from November to April the path can be icy, daylight is short, and winter equipment such as crampons and a head torch may be needed. A guide is strongly advisable in winter conditions.
Footwear matters. The route has no technical climbing, but trainers with poor grip are a bad choice on wet stone, polished slabs and boulders. Waterproof layers are also worth carrying even on a short outing, as conditions can change quickly above the fjord.
Carry food and water from the start. The café at Preikestolen Basecamp is at the trailhead, but there are no food services on the route itself, and the lakes and wet ground should not be treated as a guaranteed drinking-water plan.
Navigation is straightforward in normal visibility because the trail is marked with red-painted DNT T markings, wooden signposts and stone cairns. In cloud, rain or snow, the open rock slabs can feel less obvious, so a map or offline route on a phone is still sensible.
The key safety decision is the plateau edge. Preikestolen is unfenced, the drop is sheer, and the rock can be slippery when wet. Stay well back from the edge in wind, rain or crowds, and keep children and less confident walkers under close control.
Towns, Villages and Overnight Stops
Preikestolen is a day hike, so overnight planning is about choosing a base rather than linking huts along the route. The only practical bases named for this walk are Stavanger, Jørpeland and Preikestolen Fjellstue / Preikestolen Basecamp at the trailhead.
There are no overnight huts on the path itself. The small shelter near Tjødnane is an emergency shelter, not a booked accommodation option.
| Place | Best for | Overnight use | Key hiker notes |
|---|---|---|---|
| Stavanger | Maximum accommodation choice and easiest organised transport | Yes | Seasonal shuttle buses, cruise departures from Strandkaien, full range of hotels, hostels and apartments |
| Jørpeland | Staying closer to the trailhead | Yes | Nearest village to Preikestolen; hotels and guesthouses; seasonal shuttle links to the trailhead |
| Preikestolen Fjellstue / Preikestolen Basecamp | Earliest or most convenient trail start | Yes | Rooms, cabins, camping, café and the main car park beside the trailhead |
| Tjødnane | Emergency pause only | No | Small mountain lakes about 1 km before the plateau; emergency shelter nearby |
Stavanger
Stavanger is the main gateway base for Preikestolen and suits hikers who want the widest choice of places to stay before or after the walk. Accommodation ranges from hotels and hostels to apartments, making it the easiest option if booking late, travelling without a car or combining the hike with time in the city.
Seasonal shuttle buses run direct from Stavanger city centre to the Preikestolen trailhead, with operators such as Pulpit Rock Tours, Go Fjords and Boreal/Kolumbus. Timetables, pick-up points and operating dates change by season, so these should be checked before travelling.
Drivers reach the trailhead from Stavanger through the Ryfast subsea road link, including the Ryfylketunnelen, then continue via Solbakk and Jørpeland to Preikestolen Basecamp. The old Stavanger–Tau car ferry is no longer the standard access route since the tunnel opened.
Stavanger is also the departure point for Lysefjord sightseeing cruises from Strandkaien, which pass below Preikestolen and are sometimes combined with the hike. This is useful for hikers who want both the cliff-top viewpoint and the view from the fjord, but cruise schedules and combination options should be checked before booking.
Ryfast / Ryfylketunnelen and Solbakk
Ryfast and the Ryfylketunnelen are part of the road approach rather than an overnight stop. They matter because they make the drive from Stavanger to the Preikestolen car park straightforward, taking about 40 minutes in normal conditions via Solbakk and Jørpeland.
There is no reason to plan a walking stop here for this hike. Treat this section as transport logistics only, especially if coordinating a hire car, shuttle bus or return timing after the walk.
Jørpeland
Jørpeland is the nearest village to Preikestolen and is the most practical base for walkers who want to stay close to the trailhead without sleeping at the lodge itself. Hotels and guesthouses are available here, and the village works well if aiming for an earlier start than is convenient from Stavanger.
Seasonal shuttle buses run between Jørpeland and the trailhead. As with all Preikestolen public transport, current timetables and operating dates should be checked before travelling.
Jørpeland is also useful for reducing the pressure of the return journey. After a wet or tiring descent, staying nearby avoids having to continue straight back to Stavanger the same evening.
Food and local services are more limited than in Stavanger, so accommodation, evening meals and any supplies should be planned in advance rather than assumed on arrival. Opening hours can vary by season.
Preikestolen Fjellstue / Preikestolen Basecamp
Preikestolen Fjellstue / Preikestolen Basecamp, also known as Preikestolhytta, sits beside the main car park and marked trailhead. For pure hiking convenience, it is the best overnight stop on the route.
Accommodation includes rooms, cabins and camping, with a café at the trailhead. Staying here removes the need for a morning transfer and makes it easier to start early, which is useful on a popular route with a small, unfenced summit plateau.
This is also the key logistics point for drivers. Parking is at the trailhead car park; recent seasonal charges have been around NOK 250–275 per car, but current prices should be checked before travelling.
The marked trail begins beside the lodge and car park, so there is no approach walk from the accommodation. This is particularly helpful in poor weather, when starting with dry gear and finishing close to shelter makes the day simpler.
Urskaret / Urskarhøe
Urskaret / Urskarhøe is a trail section rather than a settlement or stopover. It comes after the first steep forest climb and boardwalks, around 1.5 km from the trailhead.
There is no accommodation, food or transport here. It is best treated as an early pacing point: if the climb already feels demanding here, allow extra time for the steeper and rockier ground higher up.
Neverdalsskaret
Neverdalsskaret is a saddle on the upper approach to Preikestolen, reached after rougher ground and scree. It is not an overnight stop and has no services.
For hikers, its value is as a navigation and effort marker on the way to the plateau. The route remains a mountain path from here, with open rock and potentially slippery slabs in wet weather.
Tjødnane
Tjødnane is a cluster of small mountain lakes about 1 km before Preikestolen. It is a natural rest point on the outward walk, especially in summer, but it is not a planned overnight location.
A small emergency shelter is located nearby. This should be understood as emergency infrastructure only, not a hut to book, camp beside or build into an itinerary.
There are no food services, shops or transport links at Tjødnane. Carry all water, food and spare clothing needed for the full out-and-back from the trailhead.
Preikestolen (Pulpit Rock) plateau
Preikestolen is the destination, not an overnight stop. The plateau is a roughly 25 × 25 m granite shelf standing 604 m above the Lysefjord, with no fence at the cliff edge.
There is no shelter, accommodation, café or water supply on the plateau. Plan to spend only as long as conditions allow, then return to Preikestolen Fjellstue / Basecamp by the same route.
Because the plateau can be crowded and exposed to wind and rain, it is not a place for prolonged stops in poor weather. Keep well back from the edge, especially when taking photos, moving around other hikers or carrying a pack.
Getting Home from the Finish
Preikestolen is an out-and-back hike, so the practical finish is not the cliff plateau but the Preikestolen Fjellstue / Preikestolen Basecamp car park, where the marked trail begins. Plan the return transport from the trailhead before setting off, especially outside the main summer season or if starting late in the day.
By train
There is no train access at Preikestolen Fjellstue / Basecamp, Jørpeland or the trailhead. Rail is not the useful way to leave the hike itself.
For any onward train travel, return first to Stavanger and connect from there. Current rail times and station-to-accommodation connections should be checked before travelling.
By bus
Seasonal shuttle buses run from the Preikestolen trailhead area back towards Stavanger city centre and Jørpeland, with operators including Pulpit Rock Tours, Go Fjords and Boreal/Kolumbus. These services are timetable-dependent and seasonal, so do not assume there will be a late bus after an evening descent.
If using the bus, check the last departure from Preikestolen Basecamp before beginning the hike and allow a buffer for slow conditions, crowds, wet rock or time spent on the plateau. The descent normally takes around 1.5–2 hours for average walkers, but delays are common when the path is busy or slippery.
Jørpeland is the nearest village for a shorter onward hop, while Stavanger is the main transport base for hotels, onward travel and fjord-cruise departures. Timetables, operating dates and pickup points should be checked before travelling.
By car/taxi
If driving, the route finishes back at the Preikestolen Basecamp car park. From there, the normal road exit is via Jørpeland and Solbakk, then through the Ryfast / Ryfylketunnelen subsea tunnel towards Stavanger; the drive to Stavanger is about 40 minutes in normal conditions.
The old Stavanger–Tau car ferry is no longer the standard approach since the Ryfast tunnel opened, so route planning should be based on the tunnel connection rather than the former ferry crossing. Parking charges at the trailhead have recently been around NOK 250–275 per car, but current fees should be checked before travelling.
A taxi can be a useful fallback if the last shuttle has gone, but availability from the trailhead should not be assumed. If a late finish is likely, pre-book a taxi or stay at the trailhead or in Jørpeland rather than relying on finding transport after dark.
From the nearest airport
Use Stavanger as the practical transfer point for airport journeys after the hike. Return from Preikestolen Basecamp to Stavanger by car, taxi or seasonal shuttle first, then connect onwards from the city.
Airport-transfer times, routes and late-evening connections are timetable-dependent and should be checked before travelling, particularly if attempting to fly out on the same day as the hike. A same-day flight is safest only with an early start, settled weather and pre-arranged transport back from the trailhead.
Where to stay at the finish
The most convenient place to stay after the hike is Preikestolen Fjellstue / Preikestolen Basecamp at the trailhead, which has rooms, cabins, camping and a café. This is the simplest option for an early start, a late return, or a slower hiking day.
Jørpeland is the nearest village option, with hotels and guesthouses and a shorter transfer than continuing to Stavanger. Stavanger has the widest choice of hotels, hostels and apartments and is the best base for onward transport, but it requires the road or shuttle journey back from the trailhead.
If depending on public transport, staying at the trailhead or in Jørpeland can remove pressure from the descent. If returning to Stavanger the same evening, check the final shuttle departure before starting the walk.
Which Direction Should You Walk?
Preikestolen is a there-and-back day hike, so the practical direction is fixed: start at Preikestolen Fjellstue / Preikestolen Basecamp car park, walk up to the Preikestolen (Pulpit Rock) plateau, then return by the same marked trail.
There is no useful “reverse” version for normal hikers. The plateau has no road access, no accommodation and no onward trailhead transport, and the small emergency shelter near Tjødnane is not an overnight hut. Plan the route as an out-and-back, not as a point-to-point walk.
Standard direction: Basecamp to Preikestolen and back
This is the traditional and most common way to walk the route. It fits the transport setup: cars, shuttle buses and trailhead facilities are all based around Preikestolen Fjellstue / Basecamp above Jørpeland.
The scenery also builds well in this direction. The route begins in forest and heath, crosses boggy ground on boardwalks, climbs through Sherpa-built stone staircases and open rock, then reaches the full Lysefjord view at the plateau. That gives the walk a clear objective and a strong psychological finish before the return descent.
The climb comes first, with around 500 m of cumulative ascent spread across several steep rises and flatter sections. This is generally preferable to descending the roughest stone steps and slabs on cold legs, though the return still needs care, especially when the rock is wet.
Reverse direction: not a practical option
Starting at Preikestolen itself is not realistic for independent walkers. The cliff is the destination, not a transport point, and the route is not designed as a through-hike.
A Lysefjord sightseeing cruise from Stavanger can pass below the cliff, but it does not turn the hike into a reverse walk from the plateau. If combining a cruise with the hike, check the current operator schedule and logistics before travelling.
Recommendation
Walk the route in the standard direction: Preikestolen Fjellstue / Basecamp car park → Tjødnane → Preikestolen plateau → return by the same path. Direction choice is not the key decision on this hike; start time, weather, footwear and transport arrangements matter far more.
Accommodation Along the Route
Preikestolen (Pulpit Rock) is a day hike, not a hut-to-hut or inn-to-inn route. There are no overnight huts on the trail itself, and the small emergency shelter near Tjødnane should be treated as safety infrastructure only, not as planned accommodation.
Accommodation planning is therefore about choosing the best base: the trailhead at Preikestolen Fjellstue / Preikestolen Basecamp, nearby Jørpeland, or Stavanger. The right choice depends on whether you want the earliest start, the nearest village base, or the widest range of transport and lodging.
| Place | Accommodation level | Best for | Notes |
|---|---|---|---|
| Preikestolen Fjellstue / Preikestolen Basecamp | Good but limited | Earliest start, late finish, staying beside the trailhead | Rooms, cabins, camping and a café at the start of the marked trail. Book ahead, especially in the main walking season and at weekends. |
| Jørpeland | Limited to moderate | Staying close to the trail without being at the car park | The nearest village base below the trailhead, with hotels and guesthouses. Useful if travelling by car or arranging local transport to the trailhead. Current taxi or shuttle options should be checked before travelling. |
| Stavanger | Good | Widest accommodation choice, car-free travel, city facilities | Full range of hotels, hostels and apartments. About 40 minutes from the trailhead by road via Ryfast / Ryfylketunnelen, with seasonal direct shuttle buses from the city centre. Also the departure point for Lysefjord cruises from Strandkaien. |
| On the trail between the car park and Preikestolen | None | Day hiking only | No planned overnight accommodation. The Tjødnane emergency shelter is not a hut booking option. Return to the trailhead by the same path. |
Best places to stay
Preikestolen Fjellstue / Preikestolen Basecamp is the most convenient option if the aim is to start before the busiest part of the day or wait for a good weather window. Staying at the trailhead removes the need for an early transfer from Stavanger or Jørpeland and makes the logistics simplest for sunrise, late-afternoon or shoulder-season starts.
Capacity at the trailhead is naturally more limited than in Stavanger, so it is the place most worth booking early. This is especially true for summer weekends, public holidays and periods of settled weather.
Jørpeland works well for hikers who want to stay near the mountain but still have a village base. It is closer to the trailhead than Stavanger, but the accommodation choice is smaller, so options can fill quickly when demand is high.
Stavanger is the strongest base for choice, services and public transport connections. It suits hikers who want a broader range of hotels, hostels and apartments, or who plan to use seasonal shuttle buses to the trailhead rather than drive.
Booking ahead and seasonal pressure
Advance booking is recommended for the main walking season, particularly for Preikestolen Basecamp and weekends. Preikestolen is Norway’s most famous day hike, so accommodation close to the trailhead can be under pressure whenever the forecast is good.
Stavanger gives the most flexibility because of its larger accommodation supply, but popular dates can still be busy. Shuttle-bus timetables, parking arrangements and current prices should be checked before travelling, as they can change by season.
Luggage, taxis and inn-to-inn planning
There is no need for luggage transfer on this route. The walk is an out-and-back day hike of about 8 km return, so most hikers leave main luggage at their accommodation or in their vehicle and carry only a day pack.
Taxi or shuttle transfers can make Jørpeland or Stavanger practical bases if you are not driving. Seasonal shuttle buses run from Stavanger city centre and from Jørpeland to the trailhead, with operators such as Pulpit Rock Tours, Go Fjords and Boreal/Kolumbus; current timetables should be checked before travelling.
This route does not work as an inn-to-inn hike. Plan one overnight base, walk to Preikestolen and back the same day, then return to the same accommodation or continue onward by road.
Camping and Wild Camping
Preikestolen (Pulpit Rock) is best treated as a day hike, not a camping route. The walk is only about 8 km return and starts/finishes at Preikestolen Fjellstue / Preikestolen Basecamp, where there are rooms, cabins, camping and a café at the trailhead.
There are no overnight huts on the marked route. The small shelter near Tjødnane is an emergency shelter, not accommodation to plan around.
Formal camping options
The practical camping option for this hike is at Preikestolen Fjellstue / Preikestolen Basecamp, beside the trailhead and car park. This is the most useful choice if you want an early start, a late return, or a simple base without staying in Jørpeland or Stavanger.
Current camping availability, booking rules and prices should be checked before travelling. The trailhead is busy in the main season, so do not assume space will be available without checking.
Wild camping: legality and reality
Norway’s allemannsretten gives broad rights to camp responsibly in nature, but Preikestolen is not an ideal place to exercise that right. This is Norway’s most famous day hike, with heavy footfall, boggy ground, narrow boardwalks, open rock slabs and an exposed, unfenced cliff edge at the plateau.
There is no recommended wild-camping section on the marked out-and-back route. The plateau itself is a poor camping choice: it is exposed, crowded at busy times, and has a sheer 604 m drop into the Lysefjord with no fence.
If considering wild camping anywhere in the wider area, local rules, protected-area restrictions, private-land issues and any fire restrictions must be checked locally before pitching. Camp well away from the path, avoid wet bog and tarn edges, use durable ground only, and leave no trace.
Water and cooking
Do not rely on facilities once you leave the trailhead. The route passes boggy ground and the Tjødnane lakes, but any natural water should be treated or filtered before drinking.
Carry enough water from the start for the full return walk unless deliberately equipped to treat water. Stove and fire rules can change with season and local conditions, so current fire restrictions should be checked before using any flame outdoors.
Low-impact camping practice
If camping at the trailhead, follow the site’s own rules. If wild camping elsewhere in the area, keep the camp small, arrive late, leave early, and avoid creating visible tent platforms or informal paths.
Pack out all rubbish, food waste and toilet paper. Do not wash directly in lakes or streams, and do not camp beside the boardwalks, on the stone steps, at Tjødnane’s main rest area, or anywhere that blocks the marked red-T trail.
Food, Water and Resupply
Preikestolen is a short day hike, so resupply is simple: carry everything needed from the trailhead and expect no food services once on the path. The only clearly available food facility at the start is the café at Preikestolen Fjellstue / Preikestolen Basecamp; exact opening hours are seasonal and should be checked before travelling.
Stavanger and Jørpeland are the practical places to sort food before the hike, especially if starting early or walking outside peak summer hours. Do not rely on being able to buy snacks at the trailhead before an early departure, on a Sunday, or late in the day without checking current opening times.
What to carry
For most walkers, a packed lunch or substantial snacks are enough for the route. The walk is only about 8 km return, but the steep stone staircases, rough rock and exposed plateau mean it is worth carrying more than a token snack, especially if waiting on the summit for views or photographs.
Carry enough water for the full return hike from the car park. A sensible starting point in normal conditions is around 1–2 litres per person, with more in hot weather, for children, or if taking a longer stop at Tjødnane or on the plateau.
Water on the route
There are small mountain lakes at Tjødnane and wet/boggy areas on the approach, but these should not be treated as guaranteed drinking-water sources. If using natural water, filter or treat it first.
The most reliable plan is to start with full bottles at Preikestolen Fjellstue / Basecamp or buy drinks there before setting out. Potable refill points and current café arrangements should be checked before travelling.
| Section | Food availability | Water availability | Notes |
|---|---|---|---|
| Stavanger / Jørpeland before the hike | Best places to buy trail food before travelling to the trailhead; exact shops and opening times should be checked before travelling. | Fill bottles before leaving accommodation if possible. | Useful if starting early, travelling by shuttle, or walking when trailhead services may be closed. |
| Preikestolen Fjellstue / Preikestolen Basecamp car park | Café at the trailhead; seasonal hours apply. | Buy drinks or fill bottles if facilities allow. This should be checked before travelling. | Last reliable service point before the hike. Do not set off expecting food on the trail. |
| Trailhead to Urskaret / Urskarhøe | None. | No reliable treated water on the path. | Eat and drink before the first steep climb if needed; the initial ascent can feel harder than the distance suggests. |
| Urskaret / Urskarhøe to Neverdalsskaret | None. | Boggy ground and wet areas may be present, but do not rely on them for drinking water. | Keep food packed securely; rough stone steps and boulders make frequent unpacking inconvenient. |
| Neverdalsskaret to Tjødnane lakes | None. | Natural water may be present at the tarns, but filter or treat it if used. | Tjødnane is a natural rest stop about 1 km before the plateau, with a small emergency shelter nearby; it is not a resupply point. |
| Tjødnane lakes to Preikestolen plateau and return | None. | No reliable treated water. | Carry enough to reach the plateau, spend time there safely, and return to the car park. Pack out all food waste. |
Terrain, Conditions and Difficulty in Practice
Preikestolen is often described as a moderate hike, but the practical difficulty comes from the surface rather than the distance. The route is short — about 3.8–4 km each way — yet it climbs and descends over rough mountain ground, with around 500 m of cumulative ascent once the undulations are included.
There is no technical climbing, scrambling grade or via ferrata-style exposure on the path itself. The demands are more ordinary but important: steep stone steps, uneven boulders, wet rock, boggy ground, and an unfenced cliff edge at the destination.
Path surfaces and underfoot conditions
The trail starts from Preikestolen Fjellstue / Preikestolen Basecamp and quickly becomes a mountain path rather than an easy tourist pavement. Expect a mix of pine forest and heath, Sherpa-built stone staircases, timber boardwalks over bog, loose and blocky rock, and open granite slabs higher up.
The Sherpa-built stone sections are a major improvement on the older eroded path, but they are still physically tiring. The steps are uneven in height and rhythm, so the climb feels more like a hill workout than a simple walk.
The boardwalks over the boggy sections are among the easiest parts of the route, but they should not be treated as guaranteed fast going in wet weather. Timber and surrounding mud can be slick, and stepping off the boards can quickly mean wet feet.
The upper sections cross ice-smoothed granite slabs and boulderier ground. In dry weather these slabs are generally straightforward for sure-footed walkers; after rain, the rock can be slippery and the descent needs more care than the ascent.
How the terrain changes along the route
| Section | What it feels like in practice |
|---|---|
| Preikestolen Fjellstue / Basecamp to Urskaret / Urskarhøe | The first main climb begins soon after the trailhead, with forest, heath, stone steps and early boardwalks. This is where many walkers realise the route is steeper and rougher than its short distance suggests. |
| Urskaret / Urskarhøe to Neverdalsskaret | The route becomes rockier and more open, with scree, boulders and broader views beginning to appear. Foot placement matters more here, especially if the stones are wet. |
| Neverdalsskaret to Tjødnane | A shorter, more varied section leading towards the small mountain lakes. Tjødnane is a natural pause point before the final approach to the plateau. |
| Tjødnane to Preikestolen | The final approach crosses more exposed rocky ground and climbs towards the granite shelf. The terrain is not technical, but fatigue, crowds and wet rock can make this last section feel slower. |
Because this is an out-and-back, every steep step and rocky slab must be descended on the return. Many slips happen when walkers are tired, rushing for a bus, or distracted after reaching the plateau.
Exposure and the plateau edge
The most serious hazard is not the trail surface but the Preikestolen plateau itself. The granite shelf is roughly 25 × 25 m and stands 604 m directly above the Lysefjord, with no fence at the edge.
Stay well back from the drop, especially in wind, rain, poor visibility or crowds. Photos near the edge are a major distraction hazard; the safest approach is to decide where to stand before taking out a phone or camera.
The final viewpoint can feel very different depending on the weather and the number of people present. On a calm, dry day it may feel spacious; in wind or when busy, the unfenced edge requires active concentration.
Climbs, descents and physical effort
The route rises in three main steps with flatter stretches between them. That broken profile makes the hike feel less like one continuous climb and more like repeated efforts, which can be tiring for walkers who set off too fast.
The headline height of 604 m is the cliff height above the Lysefjord, not the amount of climbing from the car park. The trailhead is already around 270–290 m above sea level, but the undulating route still adds up to about 500 m of cumulative ascent.
The descent is not technically difficult, but it is hard on knees and ankles. Trekking poles can be useful on the stone staircases and rocky descents, provided they are used without obstructing other walkers on busy sections.
Mud, bog and water on the trail
Boggy ground is part of the route, especially in the lower and middle sections, but the wettest ground is crossed by timber boardwalks. Waterproof footwear is still sensible, as rain and mud can affect the approaches to the boards and the rougher sections between them.
There are no river fords or tidal hazards on this hike. The main water-related issue is surface condition: wet timber, wet stone and slick granite after rain.
Waymarking and navigation difficulty
The path is waymarked with red-painted DNT T markers, wooden signposts and cairns. In normal summer conditions, navigation is usually straightforward because the route is popular and well marked.
Poor visibility can still make the upper rockier ground more serious. Cairns and red T marks are easier to miss in mist, rain or fading light, so a map/GPS track and a head torch are sensible backups rather than optional extras late in the day.
Seasonal conditions
The usual unguided hiking season is roughly May to October. Even within that window, conditions can vary sharply: a dry summer day makes the slabs and steps much easier, while rain turns the rock slick and slows both ascent and descent.
Spring and autumn can bring colder, wetter and shorter-day conditions. Start times matter more outside high summer, particularly if relying on seasonal shuttle buses or if walking late in the afternoon.
From November to April the path can be icy, snowy and dark for much of the day. Winter ascents require winter equipment such as crampons and a head torch, and using a guide is strongly advisable; current conditions should be checked before travelling.
What makes the hike easier or harder
The hike feels easier when the rock is dry, the trail is quiet, visibility is good and enough time has been allowed for a steady pace. The boardwalks, clear waymarking and rebuilt stone steps make the route accessible to many reasonably fit walkers, including families with older children.
It becomes harder in rain, wind, mist, heavy crowds or when wearing unsuitable footwear. Trainers with poor grip, rushing the descent, or treating the plateau like a fenced viewpoint are the common mistakes to avoid.
This is best approached as a short mountain hike, not a casual viewpoint stroll. Good footwear, layers for changing weather, food and water, and enough daylight make a significant difference to both safety and enjoyment.
Weather and Best Time to Walk
The practical walking season for Preikestolen is roughly May to October for unguided hikers. Outside that window, the route should be treated as a winter mountain walk: the path can ice over, daylight is short, and winter equipment such as crampons and a head torch is needed; a guide is strongly advisable from November to April.
For most independent walkers, the easiest conditions are in the middle of the May–October season, when snow and ice are least likely and daylight is more forgiving. May and October can still be good walking months, but conditions are more changeable and the trail surface should be checked before travelling.
Seasonal planning
| Period | What to expect | Practical advice |
|---|---|---|
| May–October | Main unguided hiking season. Rough stone steps, boardwalks, boulders and granite slabs are normally passable, though rain can make the rock slippery. | Start early or later in the day if visiting in busy periods, carry waterproofs, and allow time for slow movement on wet rock and around crowds near the plateau. |
| May and October | Shoulder-season conditions: colder starts, more variable weather, and a greater chance of wet, slippery or icy sections than in high summer. | Check current trail conditions before travelling, especially after cold weather. Do not assume the route is summer-dry just because the car park is accessible. |
| November–April | Winter conditions are realistic: ice on the path, short daylight and more serious consequences if weather closes in. | Not recommended as a normal independent day hike. Use winter footwear traction, carry a head torch, and consider a guided winter ascent. |
Rain, wind and visibility
Rain matters on this hike because much of the upper route crosses open granite slabs and bouldery ground. Wet rock can be slippery, and the Sherpa-built stone steps also require care on the descent.
Wind is most important at the destination. The Preikestolen plateau is unfenced, with a sheer drop of 604 m to the Lysefjord, so stay well back from the edge in gusts, rain or crowded conditions.
Fog, low cloud or heavy rain can remove the main views and make the upper rock terrain feel more exposed. If thunderstorms or very poor visibility are forecast, delaying the hike is the safer choice.
Daylight and timing
In the main season, the route is a half-day mountain walk for most reasonably fit hikers, but it should still be timed as a mountain outing rather than a roadside viewpoint visit. Allow enough daylight for a slower descent if the stones or slabs are wet.
In winter, short daylight is one of the main reasons the route becomes more serious. A head torch is essential from November to April, and turning back early is the sensible decision if progress is slower than expected.
Trail surface by season
The lower sections include pine forest, heath and boggy ground crossed by timber boardwalks. These areas can stay wet after rain, but the boardwalks make the marshiest ground easier than it would otherwise be.
Higher up, the path becomes rougher, with scree, erratic boulders and ice-smoothed granite slabs. These are straightforward in dry conditions but much slower when wet, icy or crowded.
Accommodation, transport and seasonal services
Preikestolen Fjellstue / Preikestolen Basecamp sits at the trailhead, with further accommodation in Jørpeland and Stavanger. In the busiest walking months, book ahead rather than relying on last-minute availability.
Shuttle buses from Stavanger and Jørpeland are seasonal, while driving via Ryfast / Ryfylketunnelen is the usual year-round road approach. Current shuttle timetables, parking arrangements and any trail work or diversions should be checked before travelling.
Insects are not a major planning factor for this short route compared with weather, footing and the exposed cliff edge. Standard summer hiking precautions are sufficient.
Safety Notes
Emergency planning
Preikestolen is a short day hike, but it is still a mountain route with steep ground, rough rock and a sheer cliff edge. Save the current Norwegian emergency numbers before starting; this should be checked before travelling. Do not rely on UK emergency numbers when hiking in Norway.
Tell someone your plan if hiking alone, especially if starting early, late in the day or outside the main summer period. Carry enough battery to navigate, make a call and use a torch if delayed; a power bank is sensible even on a half-day route.
Mobile signal should not be assumed to be continuous across the whole route. Download an offline map or GPS track before leaving Stavanger, Jørpeland or Preikestolen Basecamp, and keep following the red DNT T-markers, wooden signs and cairns rather than informal shortcuts.
The cliff edge at Preikestolen
The plateau is unfenced and drops 604 m directly to Lysefjord. Stay well back from the edge, particularly in wind, rain, low cloud or crowds, and keep children under close control at all times.
Do not sit, jump, pose or walk backwards near the edge for photographs. The rock shelf is large, but crowding and distraction are often the real risks at the viewpoint.
Terrain, slips and falls
The main physical hazards are the steep Sherpa-built stone staircases, uneven boulders, scree, timber boardwalks and open granite slabs. Rock can be slippery when wet, and the descent can be harder on knees and balance than the climb.
Wear proper hiking shoes or boots with good grip. Trainers with worn soles are a poor choice on wet slabs, polished stone steps and boggy sections.
The route is waymarked and does not involve technical climbing, but it is not a paved tourist path. Take particular care between Neverdalsskaret, Tjødnane and the final rocky approach to the plateau, where the trail becomes more open and exposed.
Weather, cold and daylight
The upper slabs and the plateau are exposed to wind and weather. Conditions can feel much colder than at the car park, and rain quickly makes the granite more slippery.
Carry a waterproof jacket, warm layer, food and water even if the forecast looks settled. In warm weather, the climb is short but steep, so start with enough water and avoid pushing too hard on the stone staircases.
Unguided hiking is generally a May to October activity. From November to April the path can ice over, daylight is short, and winter equipment such as crampons and a head torch may be needed; a guide is strongly advisable in winter conditions.
Water and swimming
There are boggy sections and small mountain lakes at Tjødnane, but there are no significant river crossings on the standard route. The boardwalks are there to protect both walkers and the wet ground, so stay on them where provided.
Tjødnane can be a summer swimming spot, but treat it as cold open water. Do not swim alone, do not jump from rocks, and avoid entering the water if already cold, tired or unsure of the exit point.
Crowds, solo hiking and timing
Preikestolen is Norway’s most famous day hike, so the path can be busy in the main season. Crowds reduce the feeling of remoteness but do not remove the mountain hazards: slow down on narrow rocky sections, give other walkers space and avoid being hurried near the cliff.
Solo hiking is reasonable for a fit, well-equipped walker in settled May–October conditions, but extra care is needed with timing and weather. Start early enough to complete the return comfortably in daylight, and turn back if conditions deteriorate.
Before setting off
Check the weather forecast, daylight hours, trail conditions and any diversions or trail work before leaving for the trailhead. Shuttle-bus times, parking arrangements and seasonal services should also be checked before travelling.
At the car park, make sure the group has suitable footwear, warm and waterproof layers, water, snacks, a charged phone, offline navigation and enough time for the return walk. If the plateau is in cloud, heavy rain or strong wind, treat the cliff edge with extra caution or consider waiting for better conditions.
Gear Recommendations
Preikestolen is a short day hike, but the terrain is rough enough that ordinary city footwear and minimal clothing are poor choices. Pack for a 4-hour mountain walk with steep stone steps, wet boardwalks, boulders, open granite slabs and an exposed, unfenced cliff edge at the plateau.
Footwear
Wear proper walking shoes or lightweight hiking boots with a grippy sole. The path includes Sherpa-built stone staircases, uneven boulders and smooth granite slabs, all of which can be slippery after rain.
Waterproof footwear is useful because the route crosses boggy ground, even though the wettest sections are bridged by timber boardwalks. Avoid smooth-soled trainers, sandals and casual shoes; the descent is hard on feet and knees when the stone steps are wet or crowded.
Clothing and waterproofs
Carry a waterproof jacket even in settled weather. The route climbs from the forest and heath above Preikestolen Fjellstue / Preikestolen Basecamp onto open rock, where wind and rain feel much colder than at the car park.
A warm layer is sensible in spring, autumn and on cloudy summer days, especially if you plan to spend time waiting or taking photographs on the plateau. The 604 m drop above the Lysefjord is completely unfenced, so extra care is needed in wind, rain or poor visibility.
Navigation and safety items
The trail is waymarked with red-painted DNT T markers, wooden signposts and cairns, and it is straightforward in normal visibility. Still, carry an offline map or downloaded route on a phone, as fog, heavy rain or late starts can make the upper slabs and cairns harder to follow.
A small power bank is useful if using a phone for navigation, photos and shuttle-bus information. A basic first-aid kit, blister plasters and any personal medication should be carried; there is a small emergency shelter near Tjødnane, but no staffed facility on the route.
A head torch is not normally needed for a well-timed summer hike, but it is sensible for early starts, late returns and shoulder-season days. From November to April the path can ice over and daylight is short; winter equipment such as crampons and a head torch is needed, and a guide is strongly advisable.
Water and food
Carry enough water from the trailhead for the full return walk. There are no shops or staffed resupply points between Preikestolen Basecamp and the plateau, and any use of natural water should be treated and checked locally before relying on it.
Pack snacks or lunch for the climb and the plateau. Preikestolen Basecamp has a café, but opening times and availability should be checked before travelling rather than assumed.
Trekking poles
Trekking poles are helpful on the long stone staircases and for reducing knee strain on the descent. They are less useful on bouldery or slabby ground where hand placement and balance matter more, so collapsible poles are best if using them.
Use pole tips carefully on timber boardwalks and smooth rock, particularly when the route is busy. The trail sees heavy foot traffic, so poles should be controlled on narrow sections and near other walkers.
Sun, insect and comfort items
On clear days, the upper granite slabs and the plateau are exposed, with little shade. Sunglasses, sun cream and a cap are worth carrying in summer.
Insect repellent can be useful around boggy stretches and the Tjødnane lakes in still, warm weather. A sit mat or lightweight extra layer is useful if stopping for lunch on cold rock.
For base-lodging day hikers
Most walkers stay in Stavanger, Jørpeland or at Preikestolen Fjellstue / Preikestolen Basecamp and walk with a small daypack. Keep it light, but do not strip it down so far that waterproofs, a warm layer, food, water and navigation are left behind.
Leave spare clothes and travel items at your accommodation or in the car. The route is only about 8 km return, so there is no benefit in carrying overnight kit onto the trail.
For campers
Camping gear is not needed for the hike itself. Preikestolen Basecamp offers camping as part of its trailhead accommodation, but the route is a day walk and there are no overnight huts on the path.
If camping before or after the hike, pack a separate small daypack so tent, stove and sleep kit can stay at camp. Do not rely on the small emergency shelter near Tjødnane as planned accommodation.
For fast hikers and early starters
Fast walkers can complete the route with a compact pack, but the same essentials still apply: waterproof shell, warm layer, water, food, phone with offline route and a head torch if there is any chance of finishing in low light.
Moving quickly is easiest early in the day before the stone steps, boardwalks and plateau become crowded. Speed should be reduced on wet rock and near the unfenced cliff edge; Preikestolen rewards controlled footing more than pace.
Budget and Costs
Preikestolen (Pulpit Rock) is a short day hike, so the walking day itself is simple to budget for. The main costs are getting to the trailhead, parking or shuttle transport, food for the day, and where you choose to sleep before or after the hike.
All costs are in Norwegian kroner (NOK). Prices in Norway change by season and operator, so accommodation, shuttle, cruise and guided-walk prices should be checked before booking.
Main cost items
| Cost item | What to budget for | Notes |
|---|---|---|
| Trailhead parking | Around NOK 250–275 per car in recent seasons | Applies if driving to Preikestolen Fjellstue / Preikestolen Basecamp. Confirm the current parking fee before travelling. |
| Shuttle bus from Stavanger or Jørpeland | Variable | Seasonal shuttles run from Stavanger city centre and from Jørpeland to the trailhead, with operators such as Pulpit Rock Tours, Go Fjords and Boreal/Kolumbus. Timetables and fares should be checked before travelling. |
| Driving from Stavanger | Fuel, parking and any current road/tunnel charges | The normal road approach is through Ryfast / Ryfylketunnelen to Solbakk, then via Jørpeland to the Preikestolen car park. The old Stavanger–Tau ferry is no longer the standard access route. |
| Food and drink | Variable | Carry lunch, snacks and water for the hike. A café is available at Preikestolen Fjellstue / Preikestolen Basecamp, but opening times and prices should be checked if relying on it. |
| Accommodation | Variable by location and season | Options include Preikestolen Fjellstue / Preikestolen Basecamp at the trailhead, hotels and guesthouses in Jørpeland, and a wider range of hotels, hostels and apartments in Stavanger. |
| Camping | Variable | Camping is available at Preikestolen Basecamp. This can be the cheapest way to stay close to the trailhead, but current pitch prices and booking rules should be checked. |
| Lysefjord cruise add-on | Variable | Sightseeing cruises from Stavanger’s Strandkaien pass below Preikestolen and are sometimes combined with the hike. This is an optional extra, not required for the walk. |
| Guide or package | Variable | Not normally needed for a fit, well-equipped summer walker on the marked route. In winter conditions, guided options and winter equipment become much more relevant. |
| Luggage transfer | Usually not relevant | This is an out-and-back day hike, not a multi-day hut route. Most walkers leave overnight luggage at their accommodation or in the car. |
Budget approach
The cheapest practical plan is to stay in lower-cost accommodation in Stavanger or Jørpeland, bring your own food, and use the seasonal shuttle bus if it is cheaper than hiring or running a car. If camping at Preikestolen Basecamp suits your itinerary, it can reduce accommodation costs while putting you beside the trailhead.
This approach works best if shuttle times align with your hiking plan. Always check the first and last departures before committing, especially outside the busiest summer period.
Mid-range approach
A mid-range plan is to stay in Stavanger or Jørpeland, eat one or two meals out, and either drive to the trailhead or take a direct shuttle. Driving gives more flexibility for an early start, but parking at Preikestolen Basecamp is a fixed cost to include.
Staying in Jørpeland can shorten the access journey compared with Stavanger, while Stavanger gives the broadest choice of accommodation and transport services.
Comfortable approach
The most convenient option is to stay at Preikestolen Fjellstue / Preikestolen Basecamp, start directly from the trailhead, and avoid early-morning transport logistics. This is especially useful if aiming for a quieter early start or if travelling without a car but able to connect to the lodge the day before.
A comfortable itinerary may also add a Lysefjord sightseeing cruise from Stavanger to see the cliff from below. Treat this as a separate activity cost rather than part of the hiking budget.
Costs that are easy to overlook
Allow for wet-weather clothing, proper footwear and warm layers if they are not already in your kit. The route is short, but it crosses rough stone steps, open granite slabs and boggy sections, and rock can be slippery after rain.
If using taxis between Stavanger, Jørpeland and the trailhead, check the fare before travelling. Taxi costs in Norway can be high, and no transfer is needed if the seasonal shuttle or a car suits your schedule.
Luggage Transfer, Guided Tours and Support Services
Luggage transfer
A luggage-transfer service is not normally relevant for Preikestolen (Pulpit Rock). This is a short out-and-back day hike from Preikestolen Fjellstue / Preikestolen Basecamp car park, with no overnight huts or onward trail stages requiring bags to be moved.
Carry only a daypack with waterproofs, warm layers, food, water, a charged phone and any winter traction equipment needed for the season. Main luggage is best left at accommodation in Stavanger, Jørpeland or at the trailhead if staying at Preikestolen Basecamp; any baggage-storage arrangements should be checked directly before travelling.
Guided hikes
Most reasonably fit walkers do the route independently in the main walking season, roughly May to October. The trail is waymarked with red-painted DNT T markers, wooden signposts and cairns, and the route returns by the same path.
A guide is worth considering if you are nervous on rough mountain terrain, walking with children, unfamiliar with Norwegian conditions, or aiming to start very early or late in the day. It is especially relevant outside the main season: from November to April the path can be icy, daylight is short, and winter equipment such as crampons and a head torch may be needed.
Guided winter hikes and local tour options should be booked ahead, particularly in poor-weather periods or around busy travel dates. Availability, meeting points, equipment included and current prices should be checked before booking.
Shuttle buses, tours and cruises
Seasonal shuttle buses are the main support service for walkers without a car. Operators such as Pulpit Rock Tours, Go Fjords and Boreal/Kolumbus run services from Stavanger city centre and from Jørpeland to the Preikestolen trailhead in season. Timetables vary, so return times should be checked carefully before setting off.
Some visitors combine the hike with a Lysefjord / Lysefjorden sightseeing cruise from Stavanger’s Strandkaien. Rødne Fjord Cruise operates Lysefjord cruises that pass below Preikestolen, giving the cliff view from the water rather than the trail; combined hike-and-cruise arrangements vary by season and should be checked before booking.
| Service | Best for | Planning notes |
|---|---|---|
| Seasonal shuttle bus | Independent walkers based in Stavanger or Jørpeland | Book or check timetables in advance; make sure the last return service leaves enough time for a 4-hour hike plus breaks. |
| Guided hike | Winter conditions, nervous walkers, families wanting support, poor-weather planning | Particularly useful from November to April when ice and short daylight make the walk more serious. |
| Lysefjord cruise | Seeing Preikestolen from below, or adding a fjord trip before/after the hike | Cruises depart from Stavanger’s Strandkaien; schedules and combination options vary. |
| Taxi or private transfer | Early starts, late finishes, groups, or days when shuttles are limited | Agree the fare and collection time in advance, especially for the return from the mountain car park. |
Taxi and private transfers
A taxi or private transfer can make sense for groups, photographers wanting an early start, or walkers travelling outside the seasonal bus timetable. The road approach from Stavanger uses the Ryfast / Ryfylketunnelen subsea tunnel to Solbakk, then continues via Jørpeland to the Preikestolen car park.
Do not rely on finding an immediate taxi at the trailhead after the walk. Arrange both outward and return transport in advance, and allow extra time for crowds, wet rock or slower descent on the stone steps.
Shorter Hikes and Best Sections
Preikestolen is already a short out-and-back day hike, so there are no true weekend or 3–5 day sections on the route itself. The practical choices are either to walk the full trail to the plateau, turn back at one of the natural intermediate points, or base yourself nearby and combine the hike with a Lysefjord cruise from Stavanger.
All shorter options use the same trailhead at Preikestolen Fjellstue / Preikestolen Basecamp and return by the same path. There are no alternative villages, huts or exit points along the trail.
| Best for | Start | Turnaround / End | Approx distance | Why choose it | Transport notes |
|---|---|---|---|---|---|
| Best day walk | Preikestolen Fjellstue / Basecamp car park | Preikestolen (Pulpit Rock) plateau, then return | About 8 km return | The complete classic route, with the full Lysefjord panorama and the 604 m cliff-edge viewpoint | Drive from Stavanger via Ryfast / Ryfylketunnelen and Jørpeland, or use seasonal shuttle buses from Stavanger or Jørpeland |
| Best shorter hike for beginners | Preikestolen Fjellstue / Basecamp car park | Urskaret / Urskarhøe, then return | About 3 km return | Gives a taste of the forest climb, Sherpa-built stone steps and boardwalk terrain without committing to the upper rocky slabs | Same trailhead transport; still wear proper footwear, especially after rain |
| Best half-route option | Preikestolen Fjellstue / Basecamp car park | Neverdalsskaret, then return | About 5.4 km return | Reaches higher, more open ground and the first bigger views towards the Lysefjord area, while avoiding the final exposed plateau | Same trailhead transport; allow extra time for the steep descent back over stone steps and rough ground |
| Best shorter scenic option | Preikestolen Fjellstue / Basecamp car park | Tjødnane lakes, then return | About 6.6 km return | A strong choice if weather, crowds or confidence make the plateau unappealing; the tarns are a natural rest point about 1 km before Preikestolen | Same trailhead transport; do not treat the emergency shelter near Tjødnane as accommodation |
| Best section for scenery within the full hike | Tjødnane lakes | Preikestolen plateau | About 0.7 km one way | The final approach gives the most dramatic transition from mountain tarns and bare granite to the cliff-top view over Lysefjorden | This section is only reached on foot from the main trailhead; there is no road access to Tjødnane |
| Best for public transport | Preikestolen Fjellstue / Basecamp car park | Preikestolen plateau, then return | About 8 km return | The full hike is the most worthwhile use of a seasonal shuttle journey from Stavanger or Jørpeland | Shuttle operators and timetables change by season; this should be checked before travelling |
| Best for villages and accommodation | Preikestolen Fjellstue / Basecamp, Jørpeland or Stavanger as base | Full hike or shorter turnaround | Varies | Preikestolen Basecamp is the simplest base for an early start; Jørpeland is the nearest village; Stavanger has the widest choice of hotels, hostels and apartments | If staying in Stavanger, factor in the journey through Ryfast / Ryfylketunnelen or the seasonal shuttle schedule |
Best day walk: the full Preikestolen out-and-back
For most walkers, the best “section” is the whole route: Preikestolen Fjellstue / Basecamp to the Preikestolen plateau and back. At about 8 km return, it is short enough for a day but still has around 500 m of cumulative ascent on rough, rocky ground.
This option is the only one that reaches the famous 25 × 25 m granite shelf above Lysefjorden. The plateau is unfenced, so the value of reaching it depends on safe conditions and sensible behaviour near the edge.
Shorter turnarounds
Urskaret / Urskarhøe is the best early turnaround if the first climb feels harder than expected. It still includes forest, stone steps and boardwalks, making it a useful sample of the route without pushing into the rougher upper terrain.
Neverdalsskaret is a better target for hikers who want a fuller mountain feel but do not need to reach the cliff. The route has already climbed through the main lower sections by this point, and the return still demands care on uneven stone and boulders.
Tjødnane lakes are the most rewarding shorter objective. They sit about 1 km before the plateau, with small tarns and an emergency shelter nearby, and make a sensible stopping point if wind, rain, fatigue or crowds make the final exposed section a poor choice.
Weekend, 3–5 day and camping options
There is no meaningful weekend or 3–5 day section on the Preikestolen trail itself. It is a single-day out-and-back with no overnight huts on the route and no village-to-village walking stages.
A practical weekend plan is to stay at Preikestolen Basecamp, Jørpeland or Stavanger, walk the trail on the best weather window, and consider a Lysefjord sightseeing cruise from Stavanger’s Strandkaien to see the cliff from below. Cruise times, shuttle links and prices should be checked before booking.
Camping is not needed to complete the hike. Preikestolen Basecamp offers camping as part of its trailhead accommodation, but the route itself should be treated as a day walk rather than a camping itinerary.
Highlights and Points of Interest
Preikestolen (Pulpit Rock) plateau
The main reason to walk the route is the Preikestolen plateau itself: a roughly 25 × 25 m flat granite shelf standing 604 m above the Lysefjord. It is one of Norway’s most recognisable viewpoints, with the fjord directly below and steep rock walls stretching away on either side.
The edge is unfenced and the drop is sheer, so this is not a place to rush for photos or sit close to the brink. In wind, rain, low cloud or heavy crowds, stay well back and give other walkers space to move safely.
Lysefjord views
The Lysefjord / Lysefjorden runs about 42 km inland between steep mountain walls, and the best views come in stages. Early in the hike the forest and terrain keep views limited, then the first open glimpses appear around the higher sections before the full panorama unfolds from the plateau.
If time allows, linger on the approach to the final viewpoint rather than treating the hike as a single summit dash. The changing angle on the fjord is one of the route’s rewards, especially when cloud and light are moving across the water.
Sherpa-built stone staircases
Much of the steepest walking is on substantial stone staircases rebuilt by Nepalese Sherpa craftsmen between 2013 and 2016. These sections are part of what allows such a popular route to cope with heavy footfall, but they are still physically demanding and can feel relentless on the ascent.
They are also worth noticing as trail engineering, not just as a means to an end. The steps give the walk its rhythm: steep climbs, short flatter sections, then another rise.
Timber boardwalks and boggy ground
The timber boardwalks cross the wettest marshy sections early and mid-route. They provide some of the easiest walking on the trail and help protect the fragile bog from erosion.
After rain, the surrounding ground can be saturated and the rockier sections can become slippery, so the boardwalks are a welcome break rather than a sign that the whole route is straightforward.
Urskaret / Urskarhøe and Neverdalsskaret
Urskaret / Urskarhøe comes after the first steep forest climb and boardwalks, at around 418 m. It marks the point where the route begins to feel more open and upland.
Neverdalsskaret, at around 532 m, is a higher saddle reached after rougher ground and scree. This is where many walkers begin to get a stronger sense of the fjord landscape ahead, making it a useful place to pause before continuing towards the lakes and final climb.
Tjødnane mountain lakes
Tjødnane is a cluster of small mountain tarns about 1 km before the plateau. It is the best natural rest stop on the route, with open rock, water and a small emergency shelter nearby.
In warm summer weather some walkers use the lakes as a chilly swim spot, but conditions are mountain conditions even on a short hike. Avoid relying on the shelter as a planned stop; it is an emergency facility, not a hut or café.
Glacial granite, erratic boulders and Ice Age landscape
The upper trail crosses bare, ice-smoothed granite slabs and passes large erratic boulders. These features show the area’s glacial origins, with the cliff landscape shaped by ice and frost shattering towards the end of the last Ice Age around 10,000 years ago.
This geology is also part of the walking challenge. Smooth rock can be secure when dry but much less forgiving when wet, especially on the descent.
The plateau crack and local folklore
A large fissure cuts the Preikestolen rock shelf. Local folklore links the crack to a legend that the cliff will fall into the fjord on the day seven sisters marry seven brothers from the district.
The older local name for the formation was Hyvlatånnå, meaning “the plane’s tooth”. The name Preikestolen / Prekestolen became established around 1900, when the site was being popularised by Stavanger Turistforening.
Jørpeland, Preikestolen Basecamp and Stavanger
Preikestolen Fjellstue / Preikestolen Basecamp is the practical trailhead focus, with the marked path starting beside the lodge and car park. It is the most useful place to allow extra time before or after the hike if you want food, facilities or a less rushed start.
Jørpeland is the nearest village and a convenient base close to the trailhead. Stavanger is the main gateway city, with shuttle departures and Lysefjord sightseeing cruises from Strandkaien for walkers who also want to see Preikestolen from below.
Common Mistakes and Planning Tips
Treating Preikestolen as an easy viewpoint stroll
Mistake: Planning it like a short tourist path because the route is only about 8 km return.
Fix: Allow for a proper mountain walk: around 500 m of cumulative ascent, steep Sherpa-built stone steps, boulders, open granite slabs and boggy sections on boardwalks. Most walkers need about 4 hours return from Preikestolen Fjellstue / Preikestolen Basecamp, not including long stops on the plateau.
Misreading the 604 m figure
Mistake: Assuming 604 m is the height climbed from the car park.
Fix: The Preikestolen plateau stands 604 m above the Lysefjord. The trailhead is already around 270–290 m above sea level, but the path undulates over several rises, so the cumulative ascent is still around 500 m. Pace the climb accordingly, especially on the first steep section towards Urskaret / Urskarhøe and the later climb beyond Neverdalsskaret.
Wearing city shoes or light trainers
Mistake: Turning up in smooth-soled trainers because the path is famous and well maintained.
Fix: Wear hiking shoes or boots with good grip. The rebuilt stone staircases make the route more durable, but the walking is still rough, uneven and often wet. The open granite slabs can be slippery after rain, and the descent is where poor footwear causes the most problems.
Underestimating the exposed cliff edge
Mistake: Treating the plateau as a photo platform with no real consequence.
Fix: The Preikestolen shelf is unfenced and drops sheer above the Lysefjord. Stay well back from the edge, especially in wind, rain, cloud or crowds. Do not sit, jump or pose close to the drop, and keep children under close control on the plateau and on the final rocky approach.
Starting too late for the return transport
Mistake: Focusing only on the walking time and not the bus or cruise connection back from the trailhead.
Fix: If using a seasonal shuttle from Stavanger or Jørpeland, check the current timetable before setting off and plan the descent with a buffer. Operators and schedules change by season, and this should be checked before travelling. If driving, also allow time for parking, getting ready at Preikestolen Basecamp and the return drive via Jørpeland and Ryfast / Ryfylketunnelen.
Using outdated Stavanger–Tau ferry information
Mistake: Planning the old ferry route from Stavanger to Tau.
Fix: The old Stavanger–Tau car ferry has closed since the Ryfast subsea tunnel opened. Drivers now reach the trailhead from Stavanger through Ryfast / Ryfylketunnelen to Solbakk, then via Jørpeland to the Preikestolen car park. Current road, parking and shuttle details should be checked before travelling.
Assuming services exist on the trail
Mistake: Relying on cafés, shops or huts once the walk has begun.
Fix: Treat this as a self-contained day hike. Preikestolen Fjellstue / Preikestolen Basecamp has trailhead facilities, but there are no shops or staffed huts on the route. The small shelter near Tjødnane is an emergency shelter, not overnight accommodation or a planned rest facility. Carry the food, drink and spare layers needed for the full return walk.
Planning it like a hut-to-hut route
Mistake: Looking for overnight huts on the mountain or trying to split the route into stages.
Fix: Preikestolen is a there-and-back day walk. Stay at the trailhead lodge, in Jørpeland or in Stavanger, then complete the hike as a return route from Preikestolen Fjellstue / Preikestolen Basecamp. The route sections via Urskaret / Urskarhøe, Neverdalsskaret and Tjødnane are useful pacing points, not overnight stops.
Ignoring the forecast because the walk is short
Mistake: Setting off in poor weather because the route is only around 4 km each way.
Fix: Check the mountain forecast before committing. Rain makes rock and timber boardwalks slippery, wind increases the risk near the unfenced plateau edge, and low cloud can remove the main view while making the upper slabs feel more exposed. In bad conditions, turn around before the final approach rather than pushing on for the photograph.
Walking outside the main season without winter preparation
Mistake: Assuming the path is the same year-round.
Fix: The normal unguided walking season is roughly May to October. From November to April, the path can ice over and daylight is short; winter equipment such as crampons and a head torch may be needed, and using a guide is strongly advisable. Conditions should be checked before travelling.
Relying only on the red T waymarks
Mistake: Assuming the route is impossible to lose because it is famous and waymarked.
Fix: Follow the red-painted DNT T markers, wooden signposts and cairns, but carry an offline map or GPS track as backup. On open granite, in mist or in crowded sections, it is easy to follow other people rather than the actual line. Remember that the return is by the same path back to Preikestolen Basecamp.
Forgetting that the descent takes effort too
Mistake: Spending too much energy on the climb and treating the way down as a formality.
Fix: Keep enough time and energy for the return. The stone steps, boulders and slabs can be harder on tired legs on the descent, especially when wet. Trekking poles can help some walkers on the stepped sections, but hands may still be needed for balance on rougher rock.
Arriving without a peak-season plan
Mistake: Expecting a quiet mountain trail at any time of day.
Fix: Preikestolen is Norway’s most famous day hike and attracts very high numbers of visitors in the main season. Book trailhead or Stavanger accommodation early if staying locally, check current parking fees before driving, and consider an early or later start to reduce pressure on the narrowest and most photographed sections. Parking has recently been around NOK 250–275 per car, but current prices should be checked before booking or travelling.
Final Advice
Preikestolen (Pulpit Rock) is best for walkers who want a short, dramatic Norwegian mountain hike without committing to a multi-day route. It suits reasonably fit first-timers, families with older children and experienced hikers who are happy with rough stone steps, boulders, wet slabs and an exposed cliff-top finish.
The main thing to plan carefully is not distance, but conditions. In dry, settled weather this is a straightforward moderate day hike; in rain, wind, ice or poor visibility the open granite, stone steps and unfenced plateau become far more serious. From November to April, winter equipment and preferably a guide are recommended; for independent walkers, the normal season is roughly May to October.
Transport also needs checking before travel. Drivers now reach the trailhead from Stavanger via the Ryfast / Ryfylketunnelen route towards Jørpeland, while seasonal shuttle buses run from Stavanger and Jørpeland to Preikestolen Fjellstue / Preikestolen Basecamp. Current parking fees, shuttle timetables and any trail diversions should be checked before travelling.
The most rewarding part is the final arrival on the flat granite shelf above Lysefjorden, with the fjord 604 m below and the full panorama opening beyond the earlier glimpses on the climb. The Tjødnane lakes also make a sensible pause before the last push to the plateau.
This is not a thru-hike or a route to split into sections. Treat it as a single out-and-back mountain day from the trailhead, with accommodation at Preikestolen Basecamp, Jørpeland or Stavanger rather than on the trail itself.
The final warning is simple: the plateau edge is unfenced and the drop is sheer. Stay well back from the edge, take particular care in wind, rain and crowds, and do not let the route’s popularity make it feel casual. Good footwear, a weather-aware start and sensible judgement matter more here than speed.
Reviews
How would you rate Preikestolen (Pulpit Rock)?
Tap a star to start your review — you could be the first.